Admin
The Propeller WordPress Plugin Admin Panel provides administrators with a centralized dashboard to configure and manage key settings for seamless integration with the Propeller platform. It ensures efficient control over API connections, site configurations, and communication preferences.
Manage translations
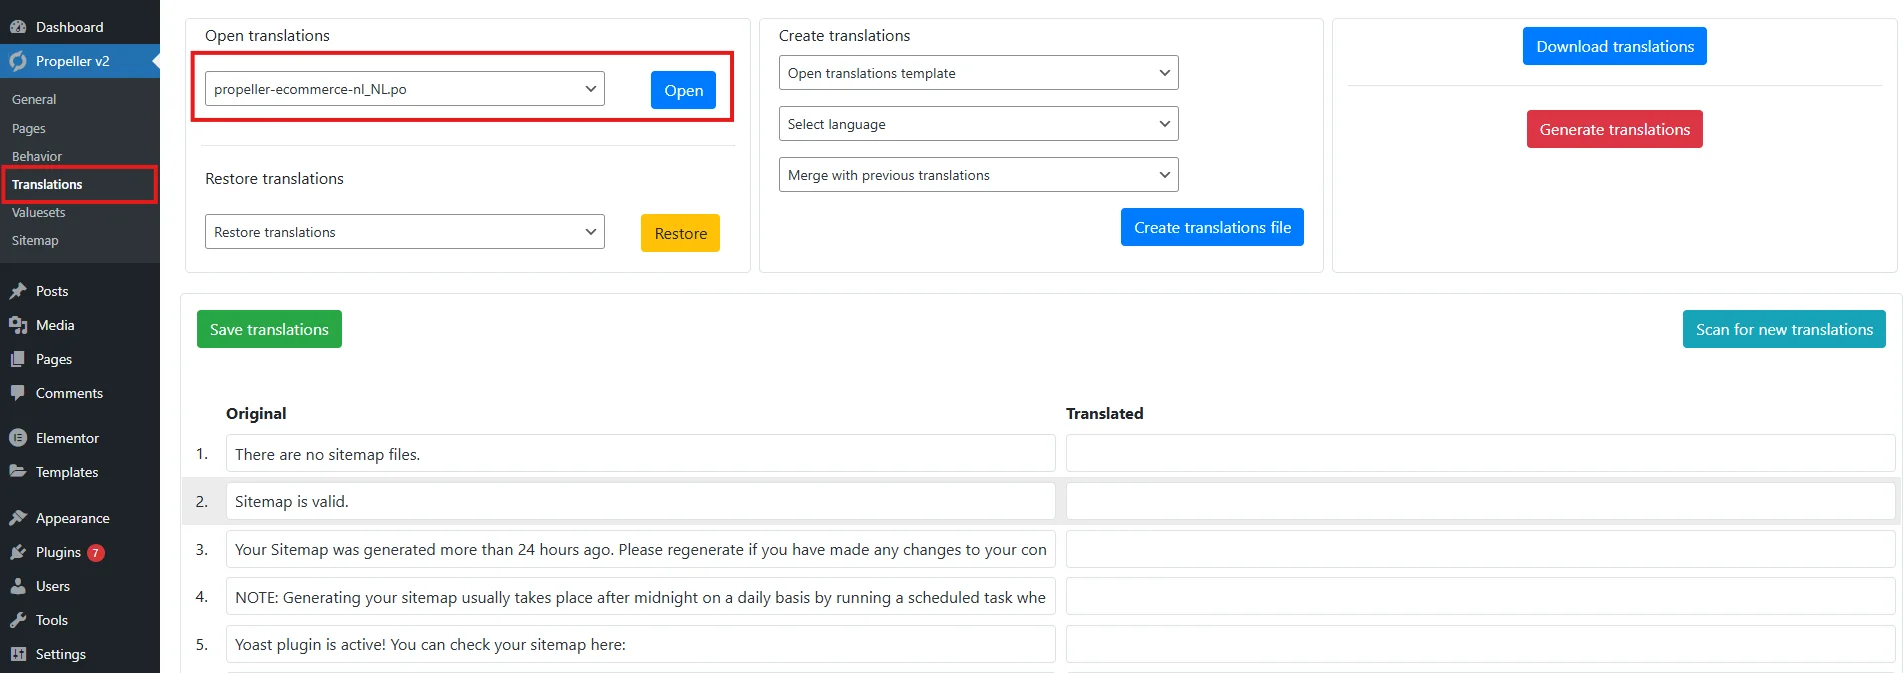
The Propeller WordPress Plugin enables administrators to manage and customize translations for their eCommerce platform. With the translation management tools administrators can translate the labels that are used in the plugin, like buttons, notifications, words etc.
Steps to Manage Translations
- Open Translations
- In WordPress admin panel, click on
Propellerapp and go toTranslations - Select the language you want to see the translations of and click the
Openbutton - At the bottom you will see the list of translateable values
- Add new translation and click
Save translationsbutton
- In WordPress admin panel, click on

- Add new translations
Once info is added in the templates (customized or default) there might be new labels that need a translation. In order to translate these new labels:-
Repeat the first step
-
Click
Scan for new translationson the right. With this all new words / phrases are retrieved in the background -
In the middle of the page, there is a section
Create Translations-
Select
propeller-commerce.potunderOpen translations templatedropdown -
Select language: choose the language you want to adjust (for example Dutch)
-
Merge with previous translations: Make sure to choose the language file you’re trying to merge with, not the first option otherwise the existing translations will be deleted. (for example Dutch)
-
Click
Create Translation filebutton
-
-
After this, the file with translateable values opens, including the newly added labels
-
After adding the new translations,click
Save Translationsbutton -
In order to make the newly added translations active click
Generate Translationson the right
-
- Restore Translations
Now and then the system makes a backup of the translations. Use theRestore Translationsoption if you encounter errors or need to revert any changes and reload the original strings from the .pot file. If translations are restored all changes made after the moment from the backup creation are lost.
Tips for Effective Translation Management
- Regularly back up your .pot files before making changes.
- Use the
Restore Translationsoption if you encounter errors or need to revert modifications. - Ensure translations are consistent and accurate for a seamless user experience.
Email Settings (CC/BCC)
The CC/BCC Email Options in the Propeller WordPress Plugin allow administrators to configure additional recipients for email communications sent from the platform. These settings enhance visibility and ensure relevant stakeholders are kept informed.
- CC Email: Adds a recipient who will receive a visible copy of all outgoing emails.
- BCC Email: Sends a blind copy to a recipient, ensuring they receive the email without their address being visible to others.
These emails are used when users submit the Price on request form in the Account section or by submitting the order Return form.
Closed vs Semi-closed vs Open portal
The Propeller WordPress Plugin supports different portal configurations — Closed, Semi-Closed, and Open to tailor access and functionality to specific business needs.
1. Closed Portal
A Closed Portal is a fully restricted environment where users must log in to view the catalog, pricing, and other portal content.
Key Features
- Restricted Access: All content is hidden until the user logs in.
- User Authentication: Only registered users with credentials can access the portal.
- Business Use Case: Ideal for B2B platforms where sensitive pricing, product details, or customer-specific content is shared.
Advantages
- Enhanced security and confidentiality.
- Customer-specific pricing and details remain private.
- Exclusively caters to authenticated users.
2. Semi-Closed Portal
A Semi-Closed Portal offers partial access to the catalog and other content while requiring users to log in for full functionality, such as viewing prices or placing orders.
Key Features
- Public Catalog: The product catalog is visible to all visitors.
- Login for Prices/Orders: Prices, stock availability, and order placement are restricted to logged-in users.
- Business Use Case: Suitable for businesses that want to showcase their products publicly but keep pricing and transactions secure.
Advantages
- Attracts potential customers with a visible product range.
- Maintains security for sensitive details like pricing and stock.
- Encourages visitors to register for full access.
3. Open Portal
An Open Portal allows unrestricted access to all content, including product catalogs, pricing, and ordering, without requiring users to log in.
Key Features
- Public Access: Anyone can view products, prices, and place orders.
- No Login Required: Users can browse and complete transactions without creating an account.
- Business Use Case: Ideal for B2C platforms or businesses targeting casual shoppers.
Advantages
- Maximizes accessibility and customer convenience.
- Reduces barriers to entry for first-time buyers.
- Encourages faster transactions with guest checkout options.
Key Differences
| Feature | Closed Portal | Semi-Closed Portal | Open Portal |
|---|---|---|---|
| Access to Content | Restricted (login only) | Partial (catalog visible) | Fully open (no login) |
| Pricing Visibility | Hidden (login required) | Hidden (login required) | Public |
| Order Placement | Restricted (login only) | Restricted (login required) | Public |
| Use Case | B2B, confidential sales | Mixed B2B/B2C | B2C, casual shoppers |
Choosing the Right Portal Type
- Closed Portal: Best for businesses with customer-specific pricing or highly sensitive information.
- Semi-Closed Portal: Suitable for businesses wanting to showcase their product range publicly while keeping transactions private.
- Open Portal: Ideal for businesses prioritizing accessibility and ease of use for a broad audience.