Create a new quote
Goal
To create a new quote in the Propeller Sales Portal, enabling you to provide potential customers with detailed pricing information and conditions for products or services. This ensures a smooth and professional quoting process.
Step 1: Navigate to the Sales Portal
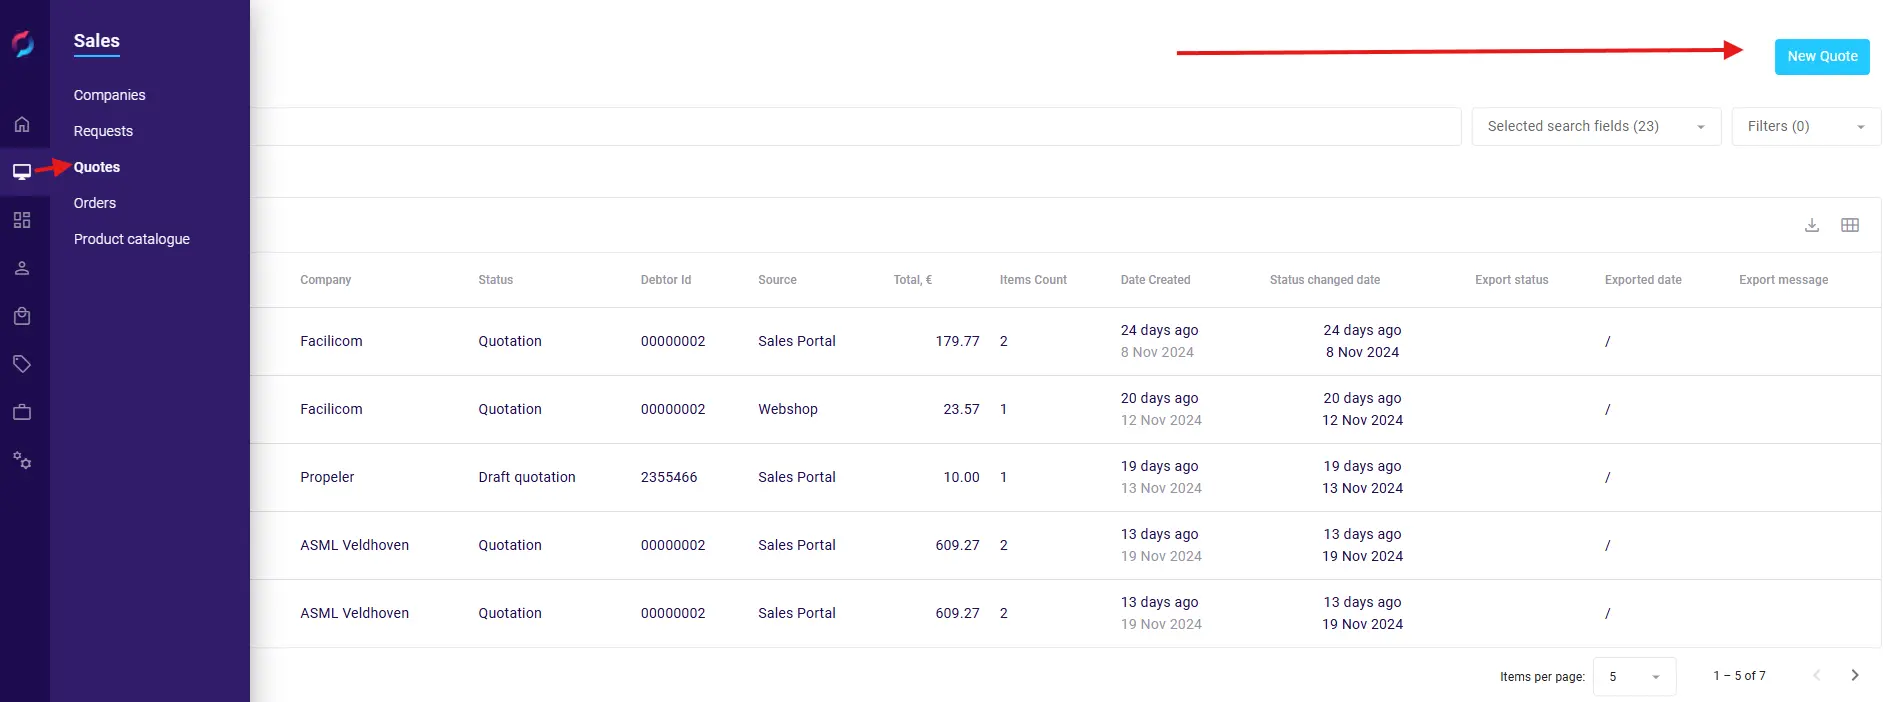
- From the backoffice menu, select Sales and then Quotes.
- The Quotes List will display existing quotes, showing details such as Quote Number, Company, Status, Total (€), and Date Created.

Step 2: Click on 'New Quote'
- At the top of the Quotes List, click the New Quote button.
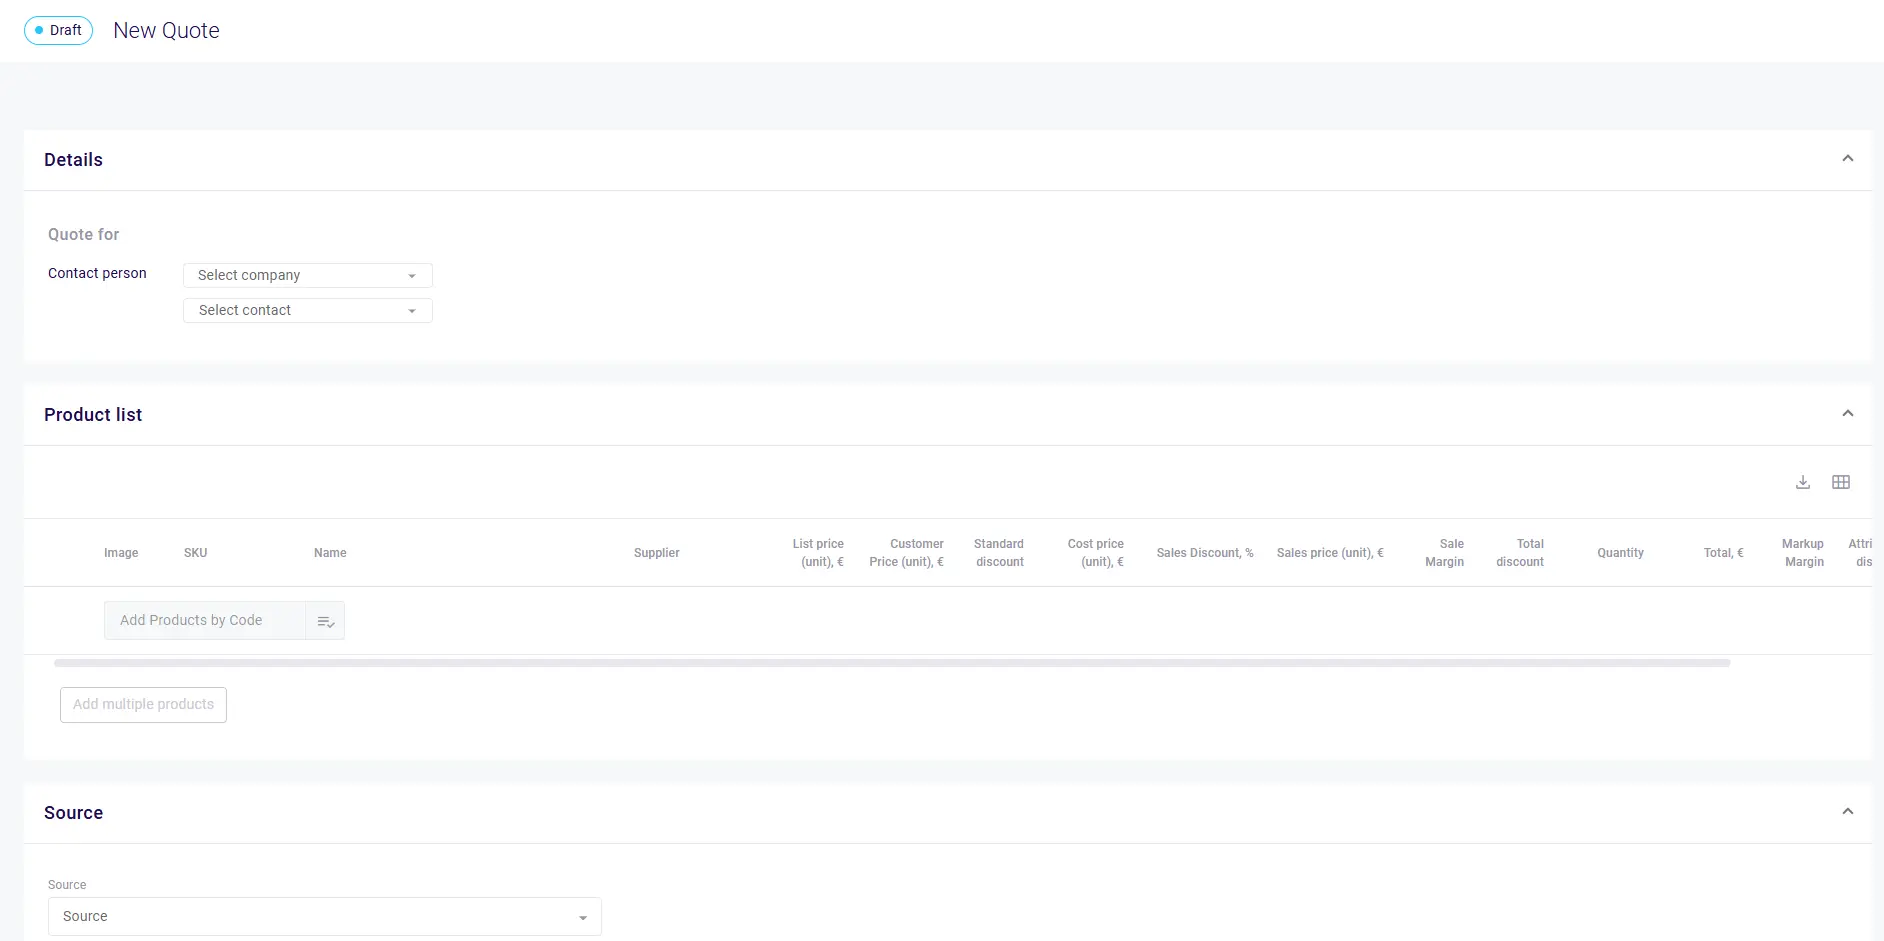
- A new screen titled Draft New Quote will appear with sections for Details, Product List, Source, Remarks, Shipping, and Financial.

Step 3: Fill in Quote Details
- In the
Detailssection:
- Quote for:
- Select Company: Choose the company placing the quote from the dropdown.
- Select Contact: Select the contact person associated with the company.
- Ensure all necessary information about the customer is correctly filled in.
Step 4: Add Products to the Quote
- In the
Product Listsection:
- Use the
Add Products by Codefeature to search and add products by SKU. - Alternatively, browse the product list to select items via
Add multiple products. - For each product, confirm the following details:
- Type, SKU, Name, and Supplier.
- Quantity: Specify the desired quantity.
- Sales Price (unit): Verify the customer-specific sales price.
- Total (€): Ensure the total is calculated based on quantity and discounts.
- Apply any necessary discounts or adjustments as required
Step 5: Specify the Source
- In the
Sourcesection:
- Indicate the order source (pre-filled with Sales Portal).
Step 6: Add Remarks
- In the
Remarkssection:
- Include any special instructions, notes, or additional conditions for the quote.
Step 7: Configure Shipping Details
- In the
Shippingsection:
- Select the shipping method.
- Select pickup location or carrier (if applicable).
- Confirm or update the expected delivery date.
- Choose if partial delivery is allowed or not.
Step 8: Finalize Financial Details
- In the
Financialsection:
- Choose payment method and payment status (if applicable).
Step 9: Save the Quote
- Once all details are complete, click
Saveto create the quote as a draft. - The quote will now appear in the
Quotes Listwith a status ofDraft Quotation.
Additional Quote Management Features
Quote List View
The quotes list provides comprehensive information including:
- Quote number: Unique identifier for each quote
- Company: Company name associated with the quote
- Status: Current status (e.g., QUOTATION)
- Debtor Id: Company's debtor identification
- Source: Origin of the quote (e.g., Sales Portal)
- Total, €: Total quote value
- Items Count: Number of line items
- Date Created: When the quote was created
- Date Updated: Last modification date
- Status changed date: When the status was last changed
- Export status: Current export status
- Exported date: When exported (if applicable)
- Export message: Any export-related messages
Quote Detail View
When viewing an existing quote, you can access:
- PDF export: Generate a PDF version of the quote
- Apply Business Rules: Apply configured business rules to the quote
- Change status: Update the quote status
- Save: Save any modifications
- Send to client: Send the quote to the customer
The quote detail includes tabs for:
- Company Details: Customer and contact information
- Product List: All quoted items with pricing details including:
- List price (unit), €
- Customer Price (unit), €
- Standard discount %
- Cost price (unit), €
- Sales Discount, %
- Sales price (unit), €
- Sale Margin %
- Total discount %
- Remarks: Customer notes and references fields
- Shipping: Shipping method, pickup location, carrier, and delivery date options
- Financial: Payment method and status information
Quote Validity Period
Quotes can include a validity period using the "Valid until" feature, which displays the expiration date for the quote (e.g., "3 days", "1 week", "2 weeks").
Shipping Cost Management
The quote allows for:
- Automatic shipping cost calculation
- Manual shipping cost adjustment
- Option to add extra discount in percentage or euro amount
Best Practices
- Accurate Details: Double-check customer information, product details, and pricing before saving.
- Draft and Review: Save quotes as drafts initially to allow for internal review before sending to the customer.
- Keep Notes: Use the Remarks section to record any non-standard conditions or customer-specific requirements.
- Track Source: Always specify the source for easier reporting and tracking of quote origins.
- Regular Updates: Periodically review draft quotes to ensure they are sent promptly or updated as needed.
- Set Validity: Always set an appropriate validity period to ensure quotes don't remain open indefinitely.
- Use References: Add customer reference numbers in the References field for better tracking.