Manage attributes
Goal
To create and manage attributes in the Propeller backoffice that provide additional information and filtering options for your catalog items. Attributes can be applied to Categories, Clusters, Companies, Contacts, Customers and Products, enabling rich data management and enhanced search capabilities.
Understanding Attributes
Attributes are custom fields that extend the default properties of items in Propeller Commerce. They enable you to:
- Add specific product characteristics (size, color, material)
- Create searchable filters for your webshop
- Store additional business information (internal codes, classifications)
- Manage customer and company data (business types, user groups)
Attribute Types
- Text: Single or multiple text values
- Integer: Whole numbers
- Decimal: Numbers with decimal places
- Enum: Predefined list of values from a valueset
- Datetime: Date and time values
- Color: Color picker selection
Step 1: Navigate to Attributes
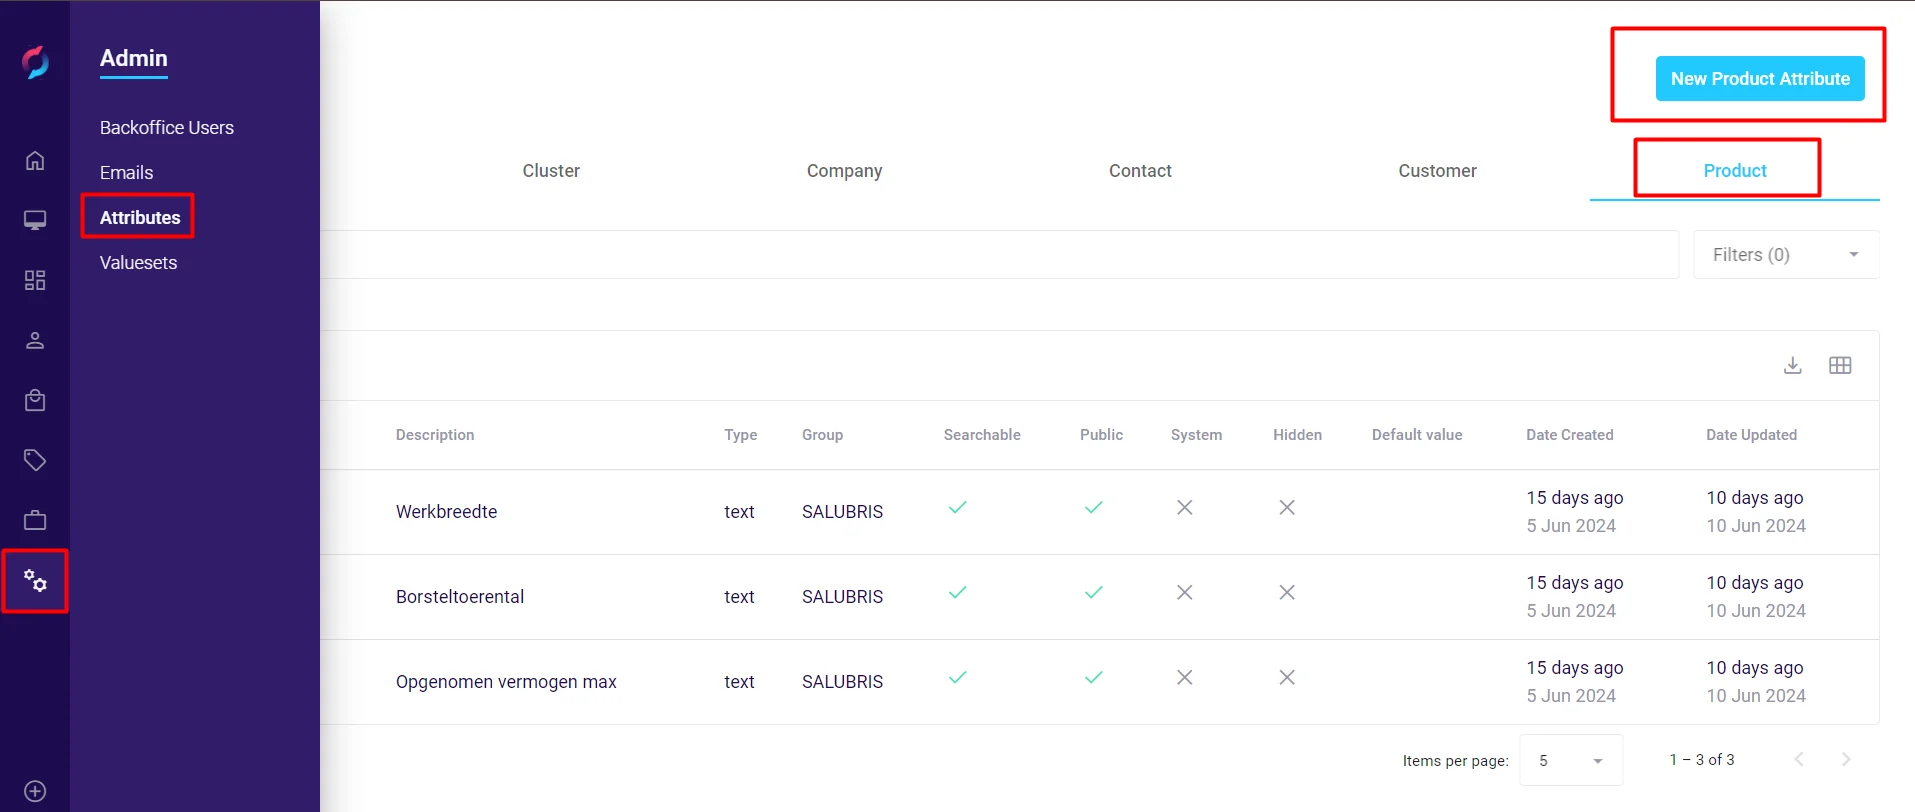
- From the backoffice menu, select Admin and then Attributes.
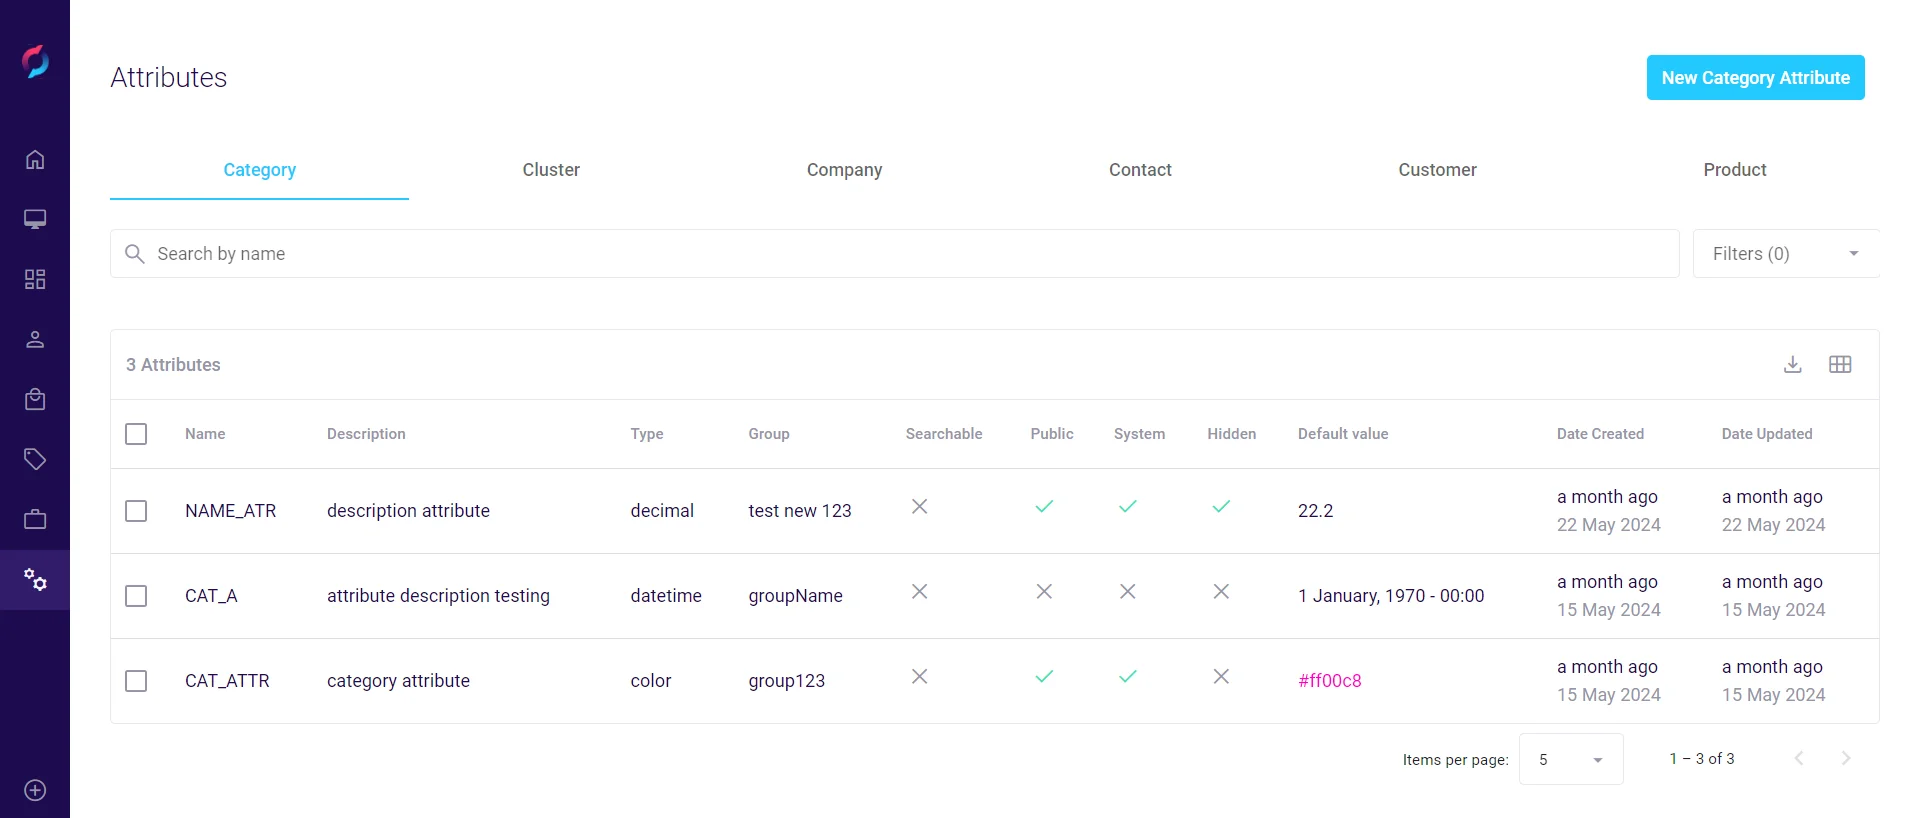
- You'll see tabs for different entity types:
- Category
- Cluster
- Company
- Contact
- Customer
- Product

Step 2: View Existing Attributes
Each tab displays a list of attributes with the following columns:
- Name: The attribute's identifier (uppercase, no spaces)
- Description: Human-readable description
- Type: Data type (text, enum, int, decimal, datetime, color)
- Unit: Measurement unit (if applicable)
- Group: Attribute grouping for organization
- Searchable: Whether it appears as a filter
- Public: Whether it's visible in specifications
- System: Whether it's protected from modification
- Hidden: Whether it's hidden from UI
- Default value: Pre-filled value for new items
- Date Created/Updated: Timestamps
Use the search bar to find specific attributes by name.
Step 3: Create a New Attribute
- Browse to the relevant tab and click the button in the top right:
- New Category Attribute
- New Cluster Attribute
- New Company Attribute
- New Contact Attribute
- New Customer Attribute
- New Product Attribute
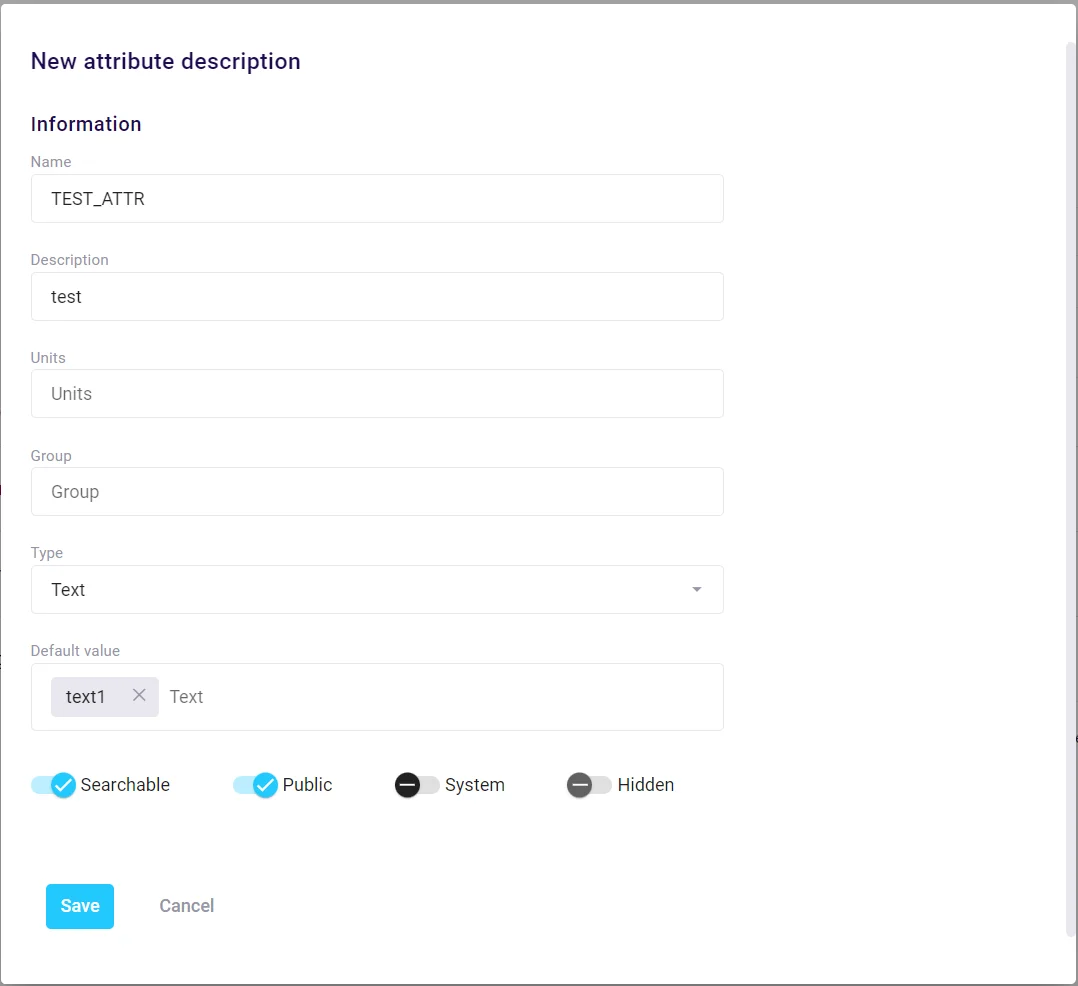
- A popup window will appear for configuring the attribute.

Step 4: Configure Attribute Information
Basic Information
-
Name: Enter a unique identifier (e.g.,
MATERIAL,WARRANTY_PERIOD) -
Use uppercase letters and underscores
-
No spaces or special characters
-
Cannot be changed after creation
-
Description (NL): Enter a user-friendly description
-
This appears in the backoffice and can be translated
-
Use the language dropdown to add descriptions in other languages
-
Units (NL): Specify measurement units if applicable (e.g., "cm", "kg", "years")
-
Optional field
-
Useful for numeric attributes
Attribute Configuration
-
Group: Optionally assign to a group for better organization
-
Groups help categorize related attributes
-
Example: "Technical Specifications", "Warranty Information"
-
Type: Select the data type:
-
Text: For descriptions, names, codes
-
Int: For whole numbers (quantity, years)
-
Decimal: For precise measurements (weight, dimensions)
-
Enum: For predefined options (requires valueset)
-
Datetime: For dates and timestamps
-
Color: For color selection
-
Default value: Set a value automatically applied to new items
-
Can be a static value or dynamic tag
-
Leave empty if no default is needed

Step 5: Configure Visibility Settings
Toggle the following options based on your needs:
Searchable
- Purpose: Makes the attribute available as a filter in category pages and search results
- Use case: Product attributes like brand, size, color that customers filter by
- Default: Disabled
Public
- Purpose: Displays the attribute in product specifications
- Visibility: Shows in both Sales Portal and webshop
- Use case: Technical specifications, features customers need to see
- Default: Disabled
System
- Purpose: Protects attribute configuration from changes
- Effect: Settings become read-only, but values can still be edited
- Use case: Critical business attributes that shouldn't be modified
- Default: Disabled
Hidden
- Purpose: Hides the attribute from standard UI locations
- Use case: Internal attributes managed through integrations or special interfaces
- Default: Disabled
Note: The actual implementation of these settings depends on your webshop and portal configuration.
Click Save to create the attribute or Cancel to discard changes.
Editing Existing Attributes
- Click on any attribute in the list to edit it.
- The edit popup shows all current settings.
- You can modify:
- Description and units
- Group assignment
- Default value
- Visibility settings
- The Name and Type cannot be changed after creation.
- Click Save to apply changes.
Best Practices
- Naming: Use UPPERCASE with underscores (e.g.,
PRODUCT_COLOR) - Organization: Use groups to categorize related attributes
- Performance: Limit searchable attributes to those customers actually use
- Data Quality: Use enum types for consistent data entry
- Planning: Design attribute structure before creation
- Maintenance: Review and clean up unused attributes regularly
Common Use Cases
Product Attributes
- Technical specs: Dimensions, weight, power consumption
- Features: Color options, material types, compatibility
- Compliance: Certifications, safety standards
- Marketing: Key selling points, target audience
Customer/Company Attributes
- Classification: Business type, industry sector
- Preferences: Communication preferences, payment terms
- Internal data: Account manager, credit limit
- Segmentation: Customer groups, loyalty tiers
Category Attributes
- Display options: Banner images, layout preferences
- Navigation: Menu position, visibility rules
Integration Notes
- Attributes can be populated through imports and API calls
- Searchable attributes automatically appear in GraphQL filters
- Enum attributes require valuesets to be configured first
- System attributes are typically managed by integrations